In a nutshell
- 🔥 Validates the sensor: the baking soda trick creates harmless particulates to confirm a smoke alarm can “see” airborne matter, unlike the test button which only checks power and sounder.
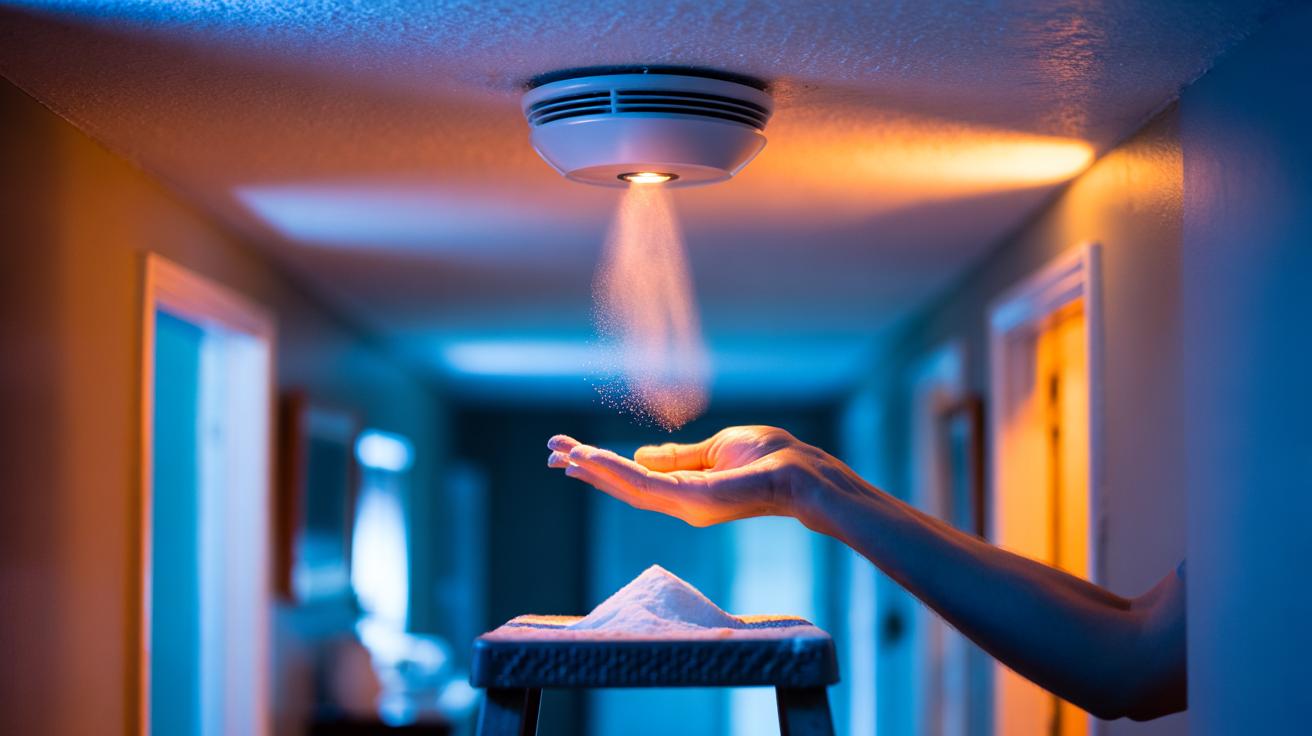
- ⏱️ Fast method: take a pea-sized pinch, stand 30–45 cm below, waft a light puff for an 8-second check; a responsive unit should chirp or alarm, then gently vacuum residual dust.
- ⚠️ Safety first: use tiny amounts, never pack powder into vents, ventilate rooms, avoid if anyone has respiratory issues, and replace alarms after ~10 years or if results are inconsistent.
- 🧪 Testing options: compare button test (power only), baking soda (indicative sensor check), and EN‑approved aerosol (robust verification); avoid messy smoke sources unless necessary.
- 📅 Smart routine: do button tests weekly, vacuum vents quarterly, document checks (especially for landlords), and act immediately on failures with battery changes or full replacement.
Every UK household relies on a smoke alarm to catch the unthinkable, yet most people only press the test button and hope for the best. That button checks the power and the buzzer. It doesn’t verify whether the sensor actually “sees” particles in the air. Enter the baking soda trick. It’s simple, cheap, and takes just eight seconds to show if your detector reacts to airborne particulates. No flames, no fumes, no gimmicks. Just a tiny pinch of a safe kitchen staple, used with care. It is not a substitute for professional servicing or an approved aerosol test, but it gives a quick, practical confidence check between routine maintenance.
What the Baking Soda Trick Is (and Why It Works)
A modern photoelectric smoke alarm looks for light scattering as particles pass through a sensing chamber. Ionisation alarms rely on how particles disrupt an electrical field. In both cases, suspended matter is the stimulus. A microscopic puff of sodium bicarbonate creates inert particles that briefly mimic the way smoke scatters light, prompting a responsive alarm to chirp or sound. That’s the essence of the eight-second check. It’s quick. It’s tidy when done properly. And it’s non-flammable.
You are not “feeding” the detector powder. You’re presenting a vanishingly small cloud beneath the vents to see if the sensor reacts. Never smear, pack, or blow material directly into the grille. That risks contamination and false alarms later. Keep the pinch tiny. Keep your distance. And keep a soft vacuum nozzle ready to clear any stray dust after the test. For households with children, pets, or asthma sufferers, conduct the check with the room well ventilated and only when necessary.
Important context: the test button remains your first weekly check for power and sounder health. The baking soda method is an occasional, sensor-specific confidence test—useful if you’ve had nuisance alarms, builders’ dust, or a long stretch between professional checks.
Step-By-Step: The 8-Second Sensor Check
1) Pick your moment. Windows cracked, extractor on if in a kitchen, and a steady step stool or platform available. If your alarm is mains-powered, confirm the indicator light is showing normal status.
2) Pinch a pea-sized amount of baking soda between finger and thumb. Not a heap. Think seasoning, not sand. Too much powder can linger and may lead to nuisance alarms.
3) Stand about 30–45 cm below the alarm. Hold your hand slightly off to one side of the vents to avoid direct deposition. Look up, check your balance, and keep one hand free for the ladder.
4) The eight seconds: release a tiny puff by rubbing your fingers gently, letting a faint mist drift upward across the sensing vents. Count to eight. A responsive unit should chirp or fully alarm almost immediately if particles enter the chamber.
5) Silence the alarm per the manufacturer’s instructions. Then lightly vacuum the air around the unit to remove any residual dust. Do not remove the detector or open the casing unless you are qualified or the device’s manual instructs you to clean a removable chamber.
If nothing happens, repeat once with a fresh, smaller pinch and steadier waft. Still nothing? Press the built-in test button to confirm power and sounder. If the button works but the soda puff doesn’t trigger, consider an EN-approved smoke aerosol or seek replacement advice.
Safety Caveats, UK Guidance, and When Not to Use It
Keep perspective. The baking soda test is an informal sensor check, not a certification. UK fire services advocate weekly button tests and regular vacuuming around alarms to clear household dust. They also endorse purpose-made test aerosols for formal verification. Use baking soda sparingly and only when you need a fast indication the optical path isn’t hopelessly clogged. If the alarm is more than ten years old, replace it—sensors degrade and no quick trick can restore them.
Health matters too. If anyone in the home has respiratory sensitivities, skip particulate tests altogether and use the button plus professional servicing. Landlords should not rely on DIY methods for compliance; provide documented checks according to UK regulations and manufacturer guidance. Never climb precariously—use a proper step stool.
Finally, respect environmental context. Recent decorating, plaster sanding, or heavy cooking smoke may coat the chamber. Vacuum around the vents first, then decide if testing is wise that day. If the alarm fails any check, replace batteries where applicable, consult the manual, or buy a new unit. No working alarm, no compromise—fit replacements immediately and test again before bedtime.
How It Compares With Other Testing Methods
Different tests answer different questions. The built-in button shows the horn and power path are alive. A brief baking soda puff suggests the sensor still notices particles. An approved aerosol simulates smoke characteristics more reliably and leaves less residue. Choose the method that matches the certainty you need, and the context you’re in—rentals, renovations, or routine home checks.
Use the table below to decide what to do tonight versus what to schedule this month. Balance speed, cost, and confidence. When in doubt, default to the manufacturer’s guidance and your local fire service advice.
| Method | Proves Power? | Proves Sensor? | Speed | Cost | Best Use |
|---|---|---|---|---|---|
| Test Button | Yes | No | Seconds | Free | Weekly routine checks |
| Baking Soda Puff | Indirect | Yes (indicative) | ~8 seconds | Minimal | Quick sensor confidence check |
| Smoke Aerosol (EN-approved) | Indirect | Yes (robust) | 1–2 minutes | Low | Annual or landlord-grade testing |
| Incense/Toaster Smoke | Indirect | Yes (messy) | Variable | Low | Last resort; avoid residue |
Remember frequency. Do the button test weekly, clean vents quarterly, and replace alarms at the manufacturer’s end-of-life. Use soda or aerosol sparingly, not as a party trick. Document test dates if you’re a landlord or HMO manager. And always keep a plan: working alarms on every storey, one in hallways and landings, plus heat alarms for kitchens where appropriate.
In a world of complex gadgets, it’s oddly satisfying that a pinch of baking soda can still tell you something critical about your smoke alarm—fast and without fuss. Treat it as a smart stopgap, not gospel. If the alarm hesitates or behaves erratically, replace it rather than rationalise the risk. Peace of mind should never hinge on luck. With that in mind, when will you schedule your next button test and try the eight-second sensor check to see what your alarm can really do?
Did you like it?4.4/5 (27)